
Textile Art (Quilts)
Not your Grandmother’s quilts!
During the pandemic shutdown I started climbing the walls. Half of what I knew about getting anything done was now suddenly shut off to me! Myself and the rest of the world too; I understand. Since I have to create or go insane, and like to sew (but have more than enough of a wardrobe,) I turned back to something I haven’t done since I was 12. That is, start quilting again.
Below are featured some of the quilts that I have created. They are listed in descending order, with the most recent at the top and the oldest at the bottom. A person’s style and technique often changes and improves the more they engage in something, so I feel it’s a fair representation.
Many thanks to my husband for taking these pictures. He normally takes pictures of flowers and landscapes. Retouching these (we both were involved in that,) to make them look like they do in real life is a whole different game, and it makes me really appreciate the work that professionals do. You’ll see some photos below that I’m not too proud of, but we did our best.
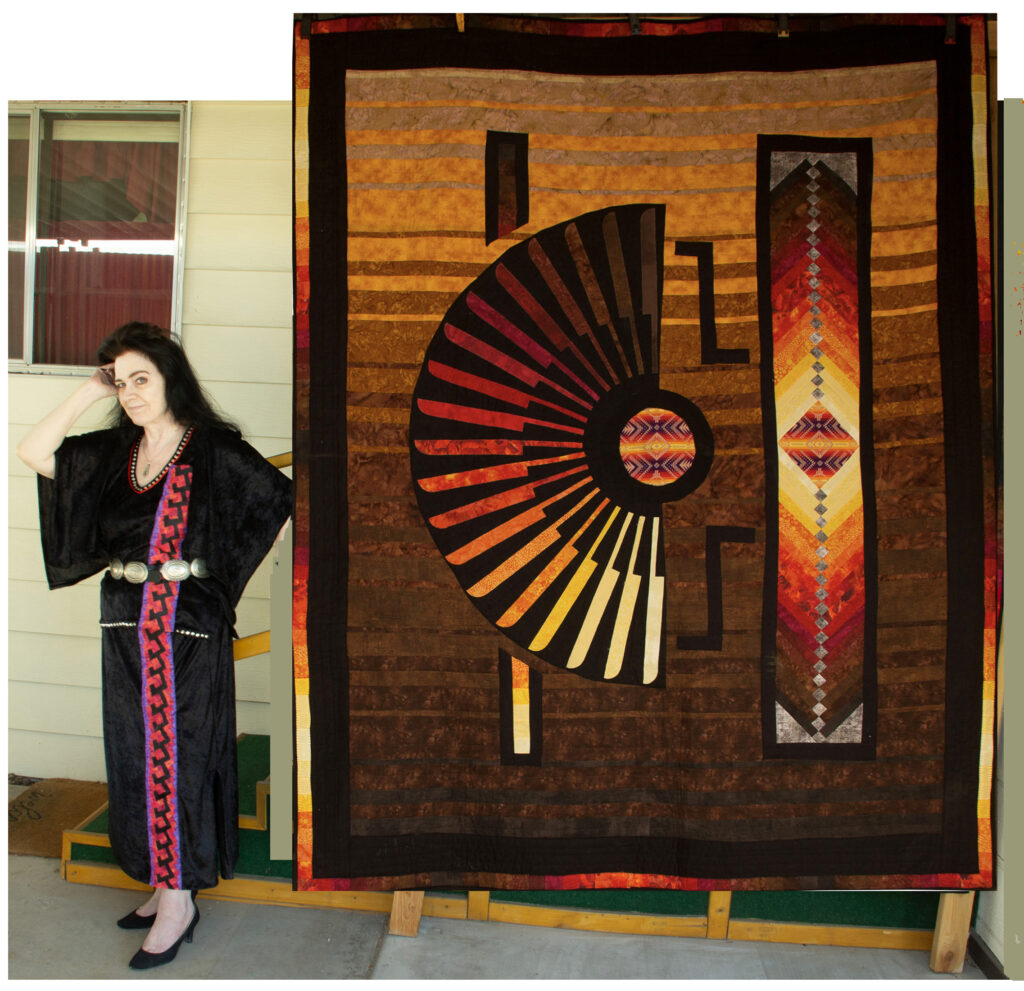
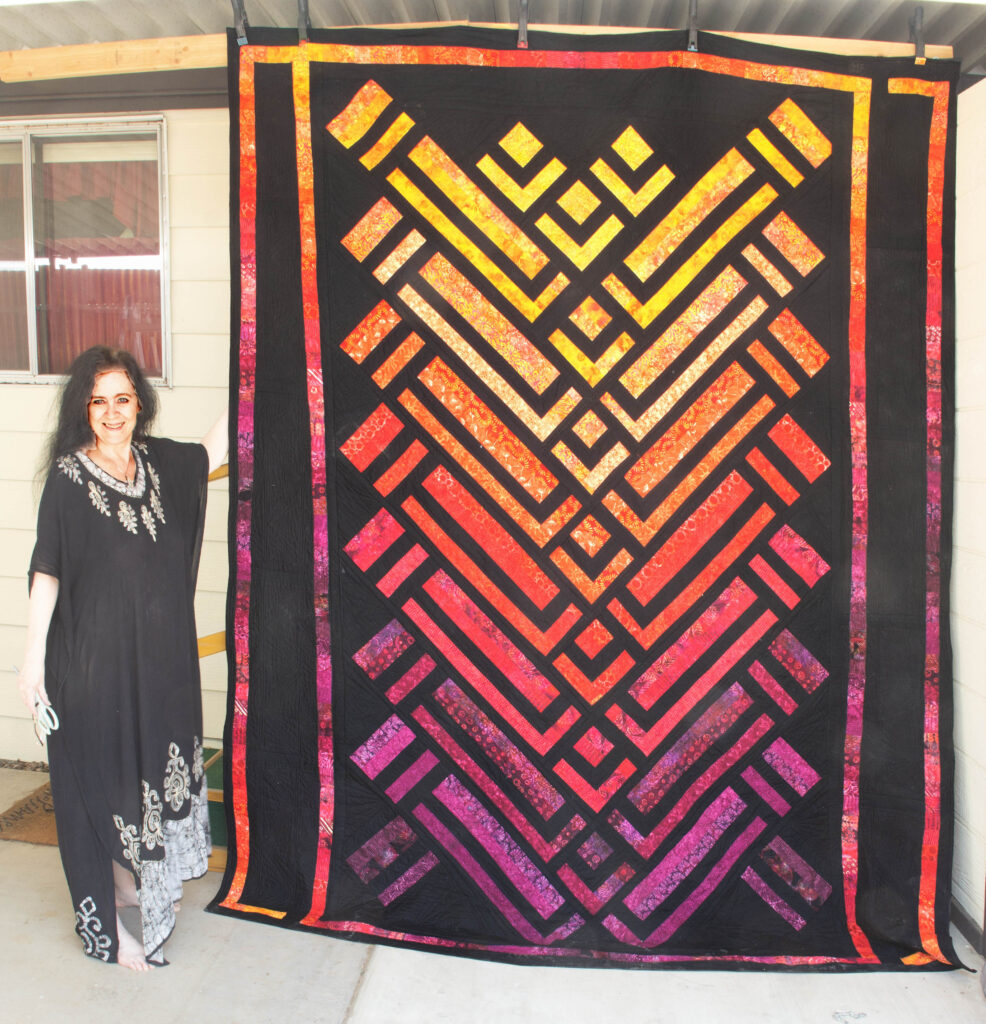
First of all, I’m not quite happy with this picture. We did our best, but this is still a quick and dirty photoshop splice. It’s actually the second time we photographed this quilt, but I didn’t feel like changing into the outfit shown, again, that I was wearing in the original. I thought, “I’ll fix it in post.” This is an example of why you should not rely on fixing things in post-production. I knew it at the time. I was just tired and wanted to get things done.
This one is called, “Desert Braid – Singular, With Feathers”. It took just a little under 40 hours to create. That’s a phenomenal record for what it takes to do this, and I have no idea how I was able to create so quickly! It’s also a sister quilt to the one pictured immediately below; “Warm Desert Braids”.
It incorporates Dresden Plate, French Braid, and Applique (both turned edge and otherwise,) construction techniques. I’m sure there’s a name for the technique of stitching row upon row of fabric together, as was done on the background to create and ombre effect, but the term for that method escapes me.
I also made the outfit that I’m wearing in this shot; blouse and skirt combination. Panne velour with silver-tone fabric studs. (All applied by hand.) The red/black band was created using a Seminole Patchwork Piecing technique. I sat down and designed a repeating, geometric pattern, then tilted it at an angle and worked out the math for how I would do it using the Seminole Patchwork Piecing method, and did so. I was holding my hand up to the side of my head to show the square shape of the sleeves.
I have another 5 yards of banding that I created in a lavender / black color scheme, also via Seminole Patchwork Piecing, that I decided to put to the side and use in the future on something else. Initially I was going to use it on this outfit, but changed my mind. (“Captain’s perogative. I changed my mind,” as Jean Luc Picard of Star Trek would say.)
The whole idea for this outfit came about when I went to a Native American get-together; not sure if that specific event would have been called a Pow-wow though. More like an art-fair market at a mueum. I was so inspired by everything I saw and wanted to get so much, but kept my hand tightly on my credit card. The designs everywhere were breath-taking. As we were leaving inspiration struck, and I clearly visualized this outfit. (No, nothing remotely like this was for sale at the event. Nor the design in the band. That is all my own creation.) I then went home, went to my supplies, and started creating…. One week later, here it was, and this is now my new favorite outfit for awhile.
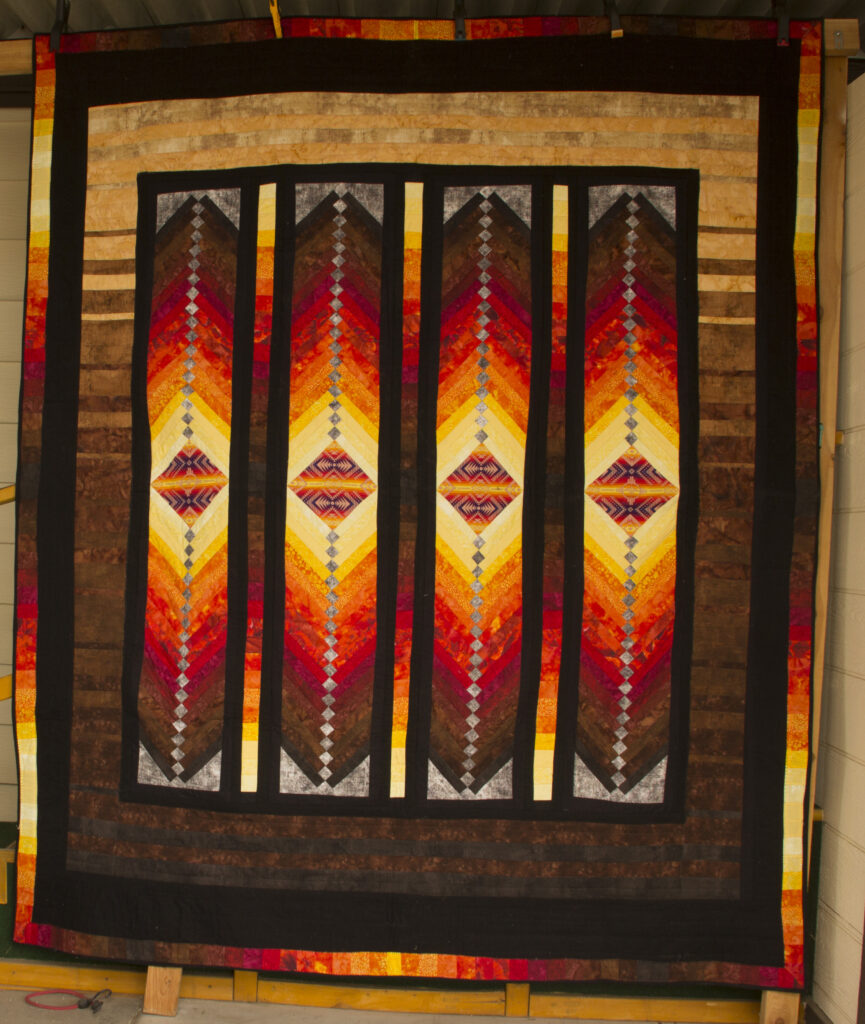
This photo was redone too. I also re-discovered the ‘transform’ option for pulling an image out perfectly square and started playing with it, with this quilt, but opted to leave it fairly ‘natural’ instead. Using that tool also distorts interiors, which I didn’t want to do. I decided to leave things as they are because it’s a more honest representation of what the quilt actually looks like. Sometimes there is such a thing as too much re-touching of a photo.
This one is called, “Warm Desert Braids,” and it is the sister quilt – and the first one made – in relation to the quilt pictured just above, “Desert Braid – Singular, with Feathers”. It took 75 hours to construct. While I was at it I wasn’t sure if I would be making it 4 columns wide or 5 columns wide, so I made 5 columns. That one, reserved column became the inspiration, along with a half-Dresden Plate of stylized feathers, for creating the sister quilt. 75 hours is still not very long for as long as constructing a quilt can take, so I don’t know why I’m getting faster – let alone the speed of the sister quilt. (???) Am I just getting better? More familiar with different styles? Practice? I really have no idea. I’m very surprised myself.
Both of the quilts in this pairing series were completed in December of 2024. That is truly a record! Two quilts in one month? I’m really shaking my head here. Creating must be something that I have to do or I will go out of my mind.
This particular quilt is created in a basic French Braid construction technique, with Applique construction thrown in too. The center diamonds are rather carefully chosen. I encourage you to open up these images in another application whereby you can zoom in and see that not only are the images in the center diamonds carefully centered and quilted around themselves, but that there are actually 3 designs in this series. Two of the designs are pictured here, with the centers of the middle two columns matching each other, and the centers of the outer two columns matching each other. In the sister quilt, ‘Desert Braid Singular’, the center motif is yet something else, and matches itself in both places on that quilt.
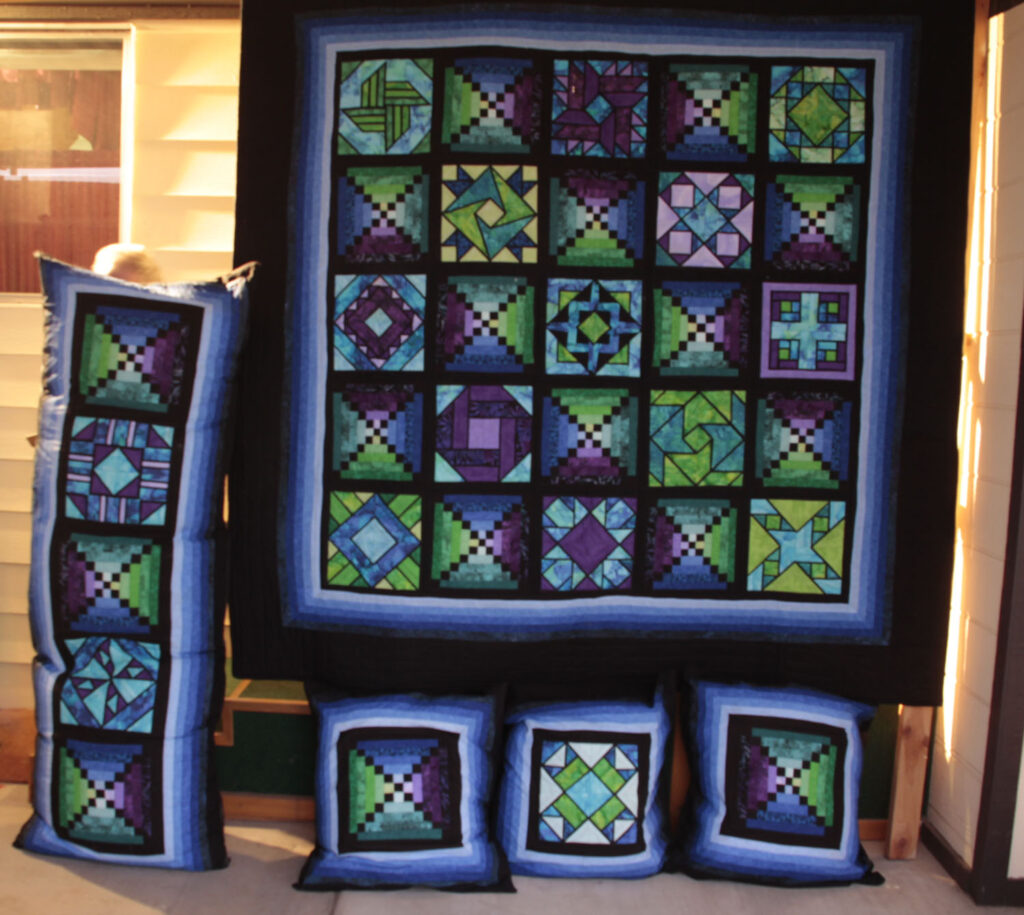
This quilt I named “Moonglow Through Stained Glass”. The construction technique of the ombre blocks is a variation on the Log Cabin construction method (there’s a whole family of variations on that.) The ‘Stained Glass’ blocks are all Foundation Paper Pieced. It’s also based on a Jinny Beyer quilt pattern entitled “Moonglow”. I decided I wanted something just a little bit different, so instead of placing alternate squares of different types of Star patterns I chose to do Paper-Pieced ‘Stained Glass’ blocks.
No, your eyes are not fooling you. Every black ‘line’ in the stained glass panels is exactly 3/16 of an inch wide. I was able to do a very precision job on this quilt. This is a good illustration of how practice and experience pay off.
I had never done Paper Piecing before. It’s actually quite time consuming. It also is not an efficient use of fabric – though the end result is well worth it. Each of the blocks you see here that have that ‘stained glass’ effect took me an average of 3 1/2 hours to create. Several took longer than that. Since I’ve been tracking my time now, I can tell you that it took me 120 hours to make the main quilt itself, and a total of 135 to create the 3 accent pillows and the body pillow that goes with. Since I created the stained glass blocks for the pillows at the same time as I was creating all the blocks for the main body of the quilt, simply an extra 15 hours isn’t quite accurate. All total more time than that went into the pillows, but overall the whole thing took me 135 hours.
Normally I would break down photographing details on the quilt, but I’ve been trying to get this page up for a couple months now. For now, here’s a picture. Hopefully I’ll come back and put in some detailed shots later. I just really needed to get this page ready for publishing…
(That’s my husband standing behind the body pillow, holding it up. =)
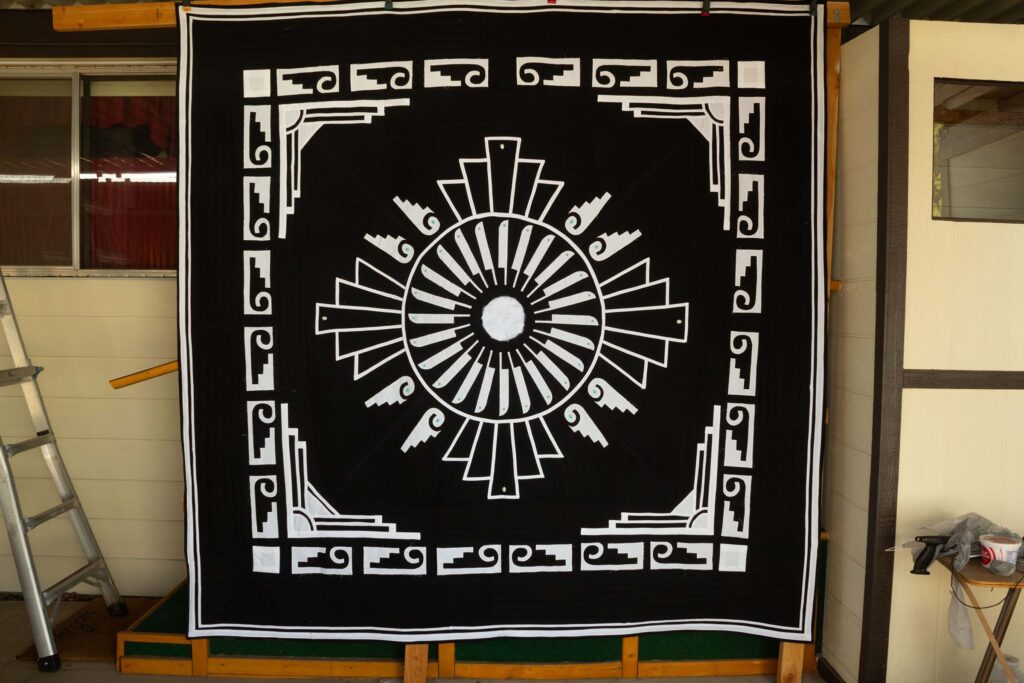
The name of this quilt is, “For Maria and Modernism.” Constructed entirely via the Dresden Plate and Applique construction techniques; in 2023 I noticed that the designs of Maria Martinez of San Ildefonz Pueblo lent themselves very well to blending with Art Deco. Since I like to incorporate Art Deco into my quilt designs I decided to create this.
I’ve started tracking exactly how long it takes me to create these and this one took 70 hours of work, plus one hour for the label stitched to a back corner (not pictured.) Normally it takes me longer. This is just a little bit smaller than I usually make. Mind you, everything is totally from scratch. No pattern! I started out with black fabric, white fabric, various notions and the right tools. (I don’t like to cut corners on doing the job right.)
Among the tools that help create what I did here specifically is a set of Bias Tape Making tools. I know how to create bias tape without having a specific tool to do so, but having a set of Bias Tape Makers made the job much easier and was well worth the agravation it saved me. It also allows for such a level of precision that I don’t think this would have turned out looking as nice if I had not used them.
A neighbor looked at this and said it looked like something that should be hanging in the lobby of a certain high-end Flagstaff hotel he was thinking of. I hadn’t thought of that. I just get going and create these things, but then I looked at it hanging up and thought, “Gee, he’s got a point.”
The image isn’t cropped because I’m relying on the background to give you a sense of scale. Pardon the clutter!
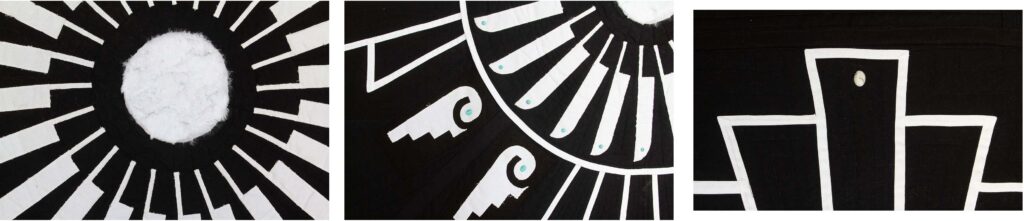
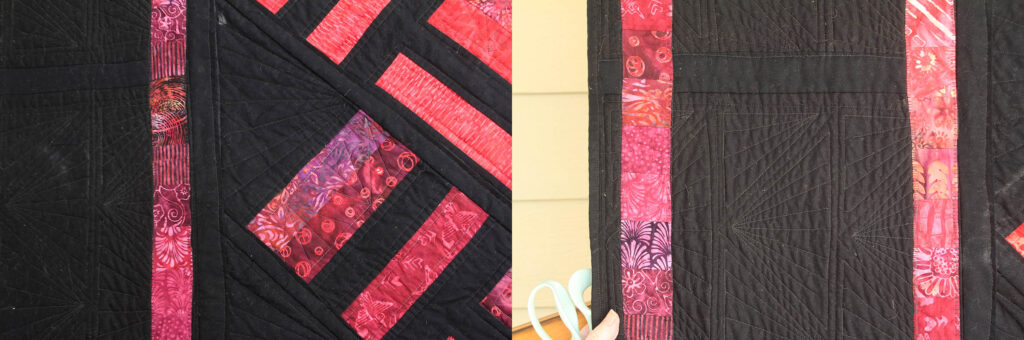
These images show some of the detailing touches on this quilt. If you need to see it larger, right click on the image and select ‘open image in new tab’. It can then also be enlarged further if you need in any image processing application of your choice. From the left, details of the faux rabbit fur in the very center of the quilt, turquoise stones at the tips of the center feathers and a few other spots, and white howlite stones at the cardinal compass points of the center design. The latter two are affixed with fabric glue that I’ve used before, so I know those stones are NOT going anywhere.
…And it’s still not perfect… I swear that quilters are their own harshest crititcs. Still, not bad for having eye-balled the placement of everything along with a tape measure and a straight edge.
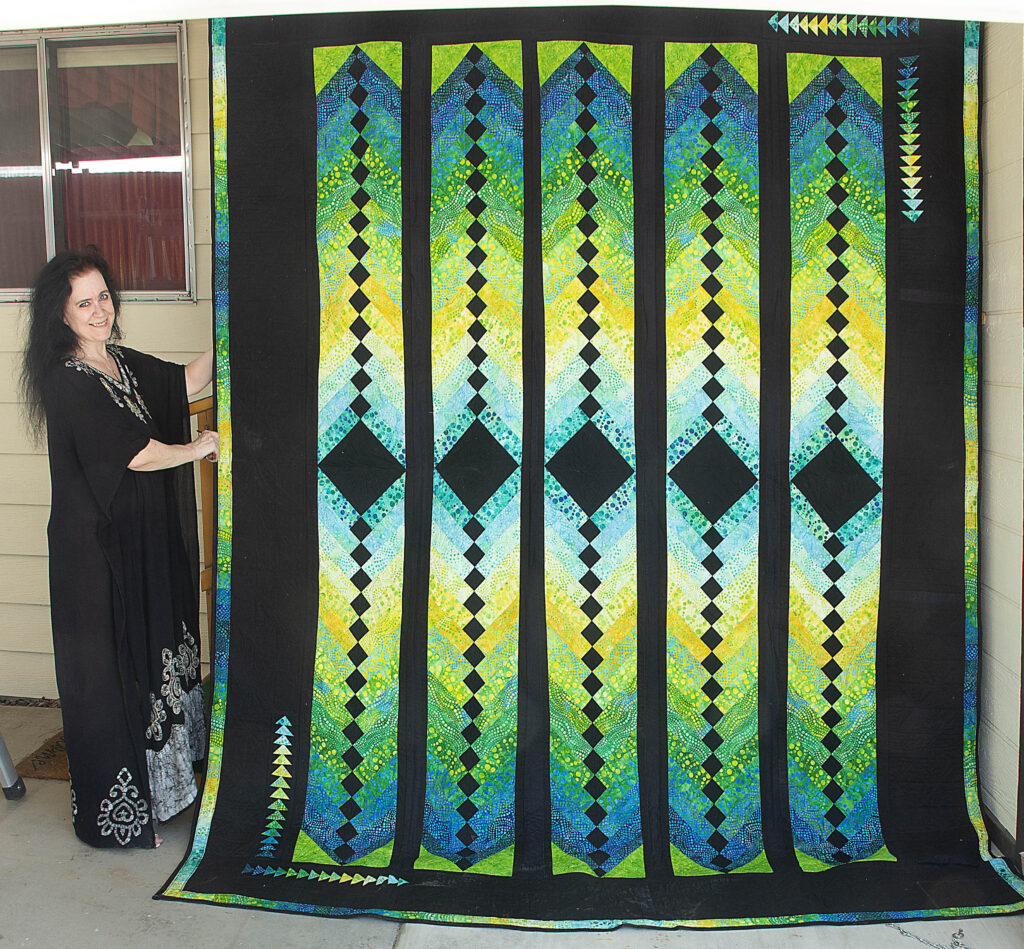
“One All-Purpose Generic French Braid Quilt in Tones of Blue, Green and Yellow” No pattern needed to create something like this. Just know the technique. As an aside, my husband sometimes tells me that I make my quilts too big. He’s got a point, but I never set out with a set, final size. I just go where the design leads.
The following images are close-ups that show details of the top-stitching and quilting patterns.
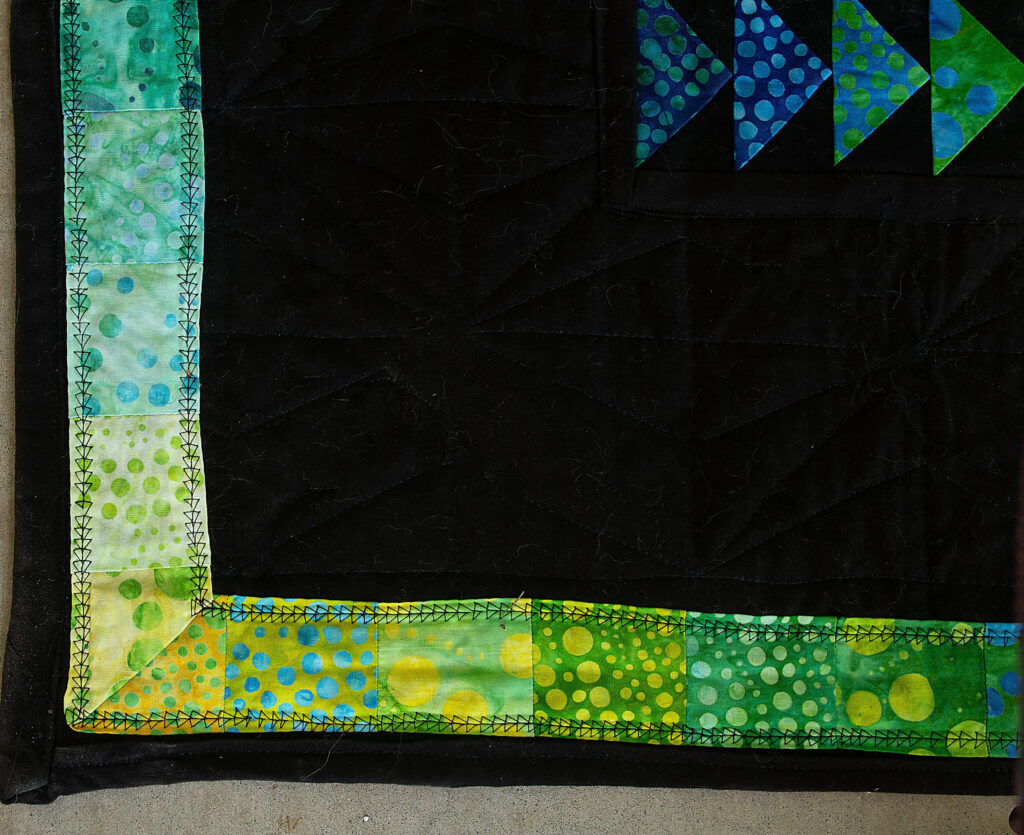
Fair warning: I’m really not proud of the following photo. It just didn’t come out right, but we did our best. The main take-away from it should be the quilting/sewing pattern that it shows. It was taken from the back of the quilt because the pattern of light through the pin-holes made it easier to make out over the sections that involved fabric that had color. If it involves layers of black fabric both front and back, then “No can do,” for showing it that way.

I definitely had to poke around for awhile before I figured out that I prefer straight-line quilting patterns over anything wavy or with curves. I have nothing against the latter. I just finally figured out that not only do I like those kind of patterns much better, but they are also much easier to do! It definitely takes practice to move fair-sized sections of sandwiched fabric around underneath a moving sewing needle, and make anything with either a curve or freeform look good. My respect to those that are able to do that well.

This one I call “Burano II”. The technique is all Log Cabin construction. It’s based on a Jinny Beyer table runner pattern called ‘Burano’. I simply looked at it and thought, “That’s gorgeous! – but it’s just a table runner. I want to do something bigger.” Hmmm… So I picked apart the pattern, extrapolating from it, and wound up with this gorgeous piece. =)
This is actually the second time I’ve made this quilt pattern. The first time I did it, I cut corners – massively. (The first attempt at this was my second quilt. I had to be on quilt #4 before I felt like my stitching and quality control were finally becoming acceptable.) The first time, I did not trim the blocks as I went along! This resulted in something that looked very mis-matched. Part of the learning curve, I guess. Doing it a second time – and doing it while holding myself to stricter standards – a secondary pattern of illusionary squares emerged, rotated 90 degrees from the initial design. I hadn’t even thought of that in the design before. I guess it just goes to show that when you do the job right some wonderful things can emerge.
I also stitched the top cover of this quilt by hand – completely. My machine was in the shop at the time. It also became my exercise in holding myself to more exacting standards. Once the top was completed I then realized that I hadn’t done any of the Quilt-As-You-Go quilting that I normally do! I had two choices: Take the top cover apart, or take it to a Long-arm Quilter. I chose the latter. I felt that I’d fussed with it enough and could treat myself this time. She did a wonderful job. She was bit back-logged for awhile, but when I got it back I couldn’t have been happier. I then proceeded to stitch the border fabric around the edges on top, stitch a quilt label on the back, and all was good.
This quilt is up there as possibly the largest one I’ve ever made. What can I say? The design got away from me. Usually I let the design tell me how big the quilt should be. This one definitely got bigger than I was planning. The irony? I deliberately cut the fabric strips narrower than usual because I knew the widths tend to add up. Yet here we are…
“Prism” (pattern sold by) Shabby Fabrics. Made from a quilt kit by the same. There’s not much to say about this one aside from, “I like it!” =) Predominantly I was experimenting with the ‘Pineapple’ construction technique. No real attention to detailed top stitching for this one. I will say that in real life the quilt is very even around the edges and border. Again, there seems to be a glitch when one actually hangs a quilt up and expects it to look as even as it does in real life. I KNOW I didn’t mess THAT up. (???)
My apologies that there’s nothing next to the image of this quilt to show it’s size. I don’t remember why I did that. Just know that it’s comparable in size to Moonglow Through Stained Glass.
Bear in mind that there are over 37 different patterns of fabric in ‘Prism’.
“Cocktail Hour” is the name of the pattern, (not my own creation.) Selection of the materials and stitching style was. This was the first quilt (fourth in order of creation) that I made where I really started to feel that my stitchwork was OK after all. Anyone who quilts knows that those who do are their own worst critics, though I will point out that the upper left-hand corner of this quilt is just fine in real life. For some reason it ended up folded in just a bit in this photo and I didn’t want to Photoshop it out for fear of distorting anything. My bad – or lack of professional skill. Take your pick. It’s also the first quilt where I realized that not only do I prefer straight-line quilting, but I have a preference for Art Deco styles.
The modern quilting standard when it comes to determining how close stitches should be in the actual ‘quilting’ phase varies depending on whom you talk to. A manufacturer might say that top-stitching can be as much as 8-10″ apart. Those who actually do the quilting tend to say anywhere from 2 1/2″ – 1 1/2″ depending on the situation. (Even that advice will vary.) I prefer to stitch much closer. I say this also because it was with this quilt, once I discovered my preferred style, that I really started to enjoy getting into stitching patterns into my quilts – without interfering with the pattern created by the fabric. (Enjoy on multiple levels! =) This quilt will always remain one of my favorites for the way it turned out.
Here are some details of the top-stitching. Brightness and Contrast have been tweaked a bit in Photoshop to attempt to bring out the details:

Four of my quilts are not pictured:
One of them is the first one (since age 12,) that I created back in 2020. I really don’t think I did a good job. It was a steep curve to get back all the little touches and considerations to do a truly good job, and I had to change the final composition because there were some things that I ignored. As a result, I couldn’t create the design I set out to do. It’s certainly useable and came out OK, but I know where I made mistakes.
The next one? It taught me that details are important. The closer to the beginning you make a mistake and don’t bother to correct it? The more it will show. Do not think, “Oh, it will be OK.” It won’t. I am absolutely not proud of how that one turned out. A friend of mine insisted to me up and down that he wanted it anyway, so I went ahead and gave it to him after replicating the pattern all over again from scratch. Bless him; he is so happy to have that quilt. (Thank you, Frank.) It makes me feel a little bit better that someone wanted that one after all.
The one after that? That was a lesson in not cutting corners; to just break down and get the right tool. I didn’t, thinking I could wing it a different way, and as a result the pieces would not come together the way they were supposed to, leading to having to alter the final design to one I really wasn’t happy with. Lesson learned there!
The fourth one not pictured? Its actually number 5 or 6 in order of creation and is unfinished, but it’s one where I really started to explore decorative, free-hand top-stitching. I had so many problems with mis-matched thread types, breakage, didn’t know about adjusting the depth of the quilting foot at that point… It just started looking really ugly, so I learned from the experience in addition to deciding not to finish it.

Something else that I am specifically burying down here because I don’t want it to be a focus, but for anyone to appreciate this sort of thing they should be aware: Creating quilts is not cheap. While the cost varies quite a bit, expect that several hundred dollars go into any given quilt that’s larger than a baby blanket. Maybe you can make something that small out of scraps, but don’t count on it. That would be for the cost of the materials alone. It a person shops out the actual quilting then that is another few hundred added to the price tag of the final quilt. I point this out because a lot of people don’t realize this. They say things like (for a quilt the size I make,) “Wow! That’s something special! I’d pay up to $75 for something like that.” (That’s my cue to accidently swallow my coffee wrong and choke.) I don’t blame them, but just be aware.
People also tend to not understand just how much work goes into these. That’s one reason I started tracking my hours.
Here are some stats according to Google’s AI:
AI Overview
According to recent surveys, the average quilter in the United States is:
- Female: 98% of quilters identify as female
- Retired: 70% of quilters are retired
- In their 60s: The average quilter is in their 60s
- Has a high income: The average quilter has a household income of $65,000 or more
- Has been quilting for a long time: The average quilter has been quilting for over 10 years
- Comfortable with technology: The average quilter is comfortable with technology
- Works on many projects: The average quilter starts 10–12 quilt projects each year
- Prefers traditional quilting: 85% of quilters prefer traditional quilting over modern or art quilting
The average quilter spends more than six hours per week working on quilting projects. They also spend an average of $3,363 per year on quilting.
I’ve also seen a statistic that the average quilter has $5,000 in tools. I can believe that! Some of the clerks I talk to in fabric stores that cater more to quilters turn out to be people who work there because they are quilters themselves, and are there because they love working with other creative people. (No one works there for the money. What money?) In my experience it’s also not unusual for the serious ones to have 4 – 5 machines. Having at least two machines is a must. What are you going to do if your machine needs to go into the shop? Then – Oh My! – “You just have to see this embroidery machine over here.” What about that collectable Singer Featherweight that a grandmother used? (Preferably your own grandmother, though that is not always possible.) Wait… You quilt that much, and you have not purchased a $15,000 long-arm quilting machine? Time to knock out a wall in the house after getting the proper permits and adding on another room…
OK, I heard some snickers when I said that last one – but it’s actually true for some people! (Not me. I use the ‘Quilt-as-you-go’ method.) Still, I have been eyeing a certain embroidery machine and considering expanding my skill set.
This doesn’t even get into how much fabric quilters tend to have on hand. I have no idea how much fabric is actually in my ‘stash’, but it’s a lot. It’s not unusual to joke about the heating and cooling bill for the house being lower because of all the fabric stored on hand very effectively acting as additional insulation. One woman on YouTube actually calculated up the yards of ready-to-use fabric in her average-sized sewing room. What did it come to? 1200 yards, minimum. Yes, you saw that right. 1,200. Twelve-hundred.
I will say that this doesn’t happen overnight. I’m not in as deeply as that, but I’ve also only been doing this again for 5 years. Still, yes, my stash in folded and filed like a very large card file in many bins, organized so that I can decide what I want to create, then simply go to my stash and go through it like going through an old-school index file and picking out the colors and textures I want to use.
There’s a lot to this that – unless you do it yourself – chances are you have no idea just how involved and indepth it it. Maybe this helps to give a clue to the casual reader. I don’t expect people to truly comprehend all this. I just hope my quilts are appreciated and not given to a dog; – then thrown out because they’re dirty.
Speaking of which, most quilts are given away. Why? There’s no way anyone will pay what a quilt is actually worth. Calculating for the time it takes to create them, cost of materials, and the skill that I’ve had to develop, I value mine at a minimum of $2,000 each. No one is going to pay that. With much time and persistence maybe a person will give you a fraction of what it’s really worth. If you cave to that price then it undercuts all quilters. That’s ironic because you really can’t buy any kind of a blanket or comforter that has the same weighted feel and specific kind of drape that a quilt does – which has very beneficial physiological results I talk about in the next paragraph. Like most quilters I cautiously do my best to determine whether the person I will give it to will be valuing it, especially in the long run, or if they are likely to treat it like a cheap Walmart blanket. I want them to use it, but I also want them to value it. Quilts are so wonderful to sleep under that there’s always someone out there who will.
Here’s a link to what Penn Medicine says about sleeping underneath a blanket with weight, which is definitely a quilt: https://www.pennmedicine.org/updates/blogs/health-and-wellness/2022/march/weighted-blankets#:~:text=This%20is%20often%20called%20the,an%20overall%20sense%20of%20calm.
They really do evoke a physiological response in accord with being held, hugged, and feeling safe. That’s just one article. There are more. Do some Googling if you’re curious. I will never go back to willingly NOT sleeping underneath a quilt again. I just can’t describe the difference that it creates.
I hope you enjoyed looking these quilts over. May your day be a little bit brighter for looking at some creative designs that are also wonderfully functional. There is just nothing like the weighted feel of sleeping underneath a home-made quilt. In fact, go ahead and sleep underneath two. =)
Sandra